• Home
  • S H O P
  • B L O G
Menu

Gentle Meadows

TRADITIONAL CHILDREN'S CLOTHING
  • Home
  • S H O P
  • B L O G
Stinging Nettle Dried

Stinging Nettle Infusion - Mineral Load

May 15, 2017

What are Stinging Nettles?

Stinging nettle (Urtica dioica) is an herb that has a long medicinal history. Stinging Nettle has fine hairs on the leaves and stems that contain very irritating (stinging) chemicals which are released when it comes in contact with the skin.  I remember hiking to the river as a young girl and getting stung by these powerful plants.  Although this plant has stinging hairs, according to the University of Maryland Medical Center, it has been used for hundreds of years to treat painful muscles and joints, eczema, arthritis, gout, and anemia. Today, many people use it to treat urinary problems during the early stages of an enlarged prostate.  It is also used for urinary tract infections, hay fever (allergic rhinitis), or in compresses or creams for treating joint pain, sprains and strains, tendonitis, and insect bites.

What are the benefits of stinging nettle?

A surprisingly nutrient dense herb, nettles provide an excellent source of calcium, magnesium, potassium, iron, chlorophyll, beta carotene, phosphorous, zinc, chromium, B vitamins, chlorophyll and other trace minerals including selenium, silicon and manganese. The high concentration of minerals supports the building of strong bones, muscles, teeth, nervous system; as well as hormones, kidney, adrenal and immune systems. The anecdotal testimonies of improved health and well-being from adding herbal infusions to a healing protocol or a healthy lifestyle, are numerous. 

How do I consume Stinging Nettle?

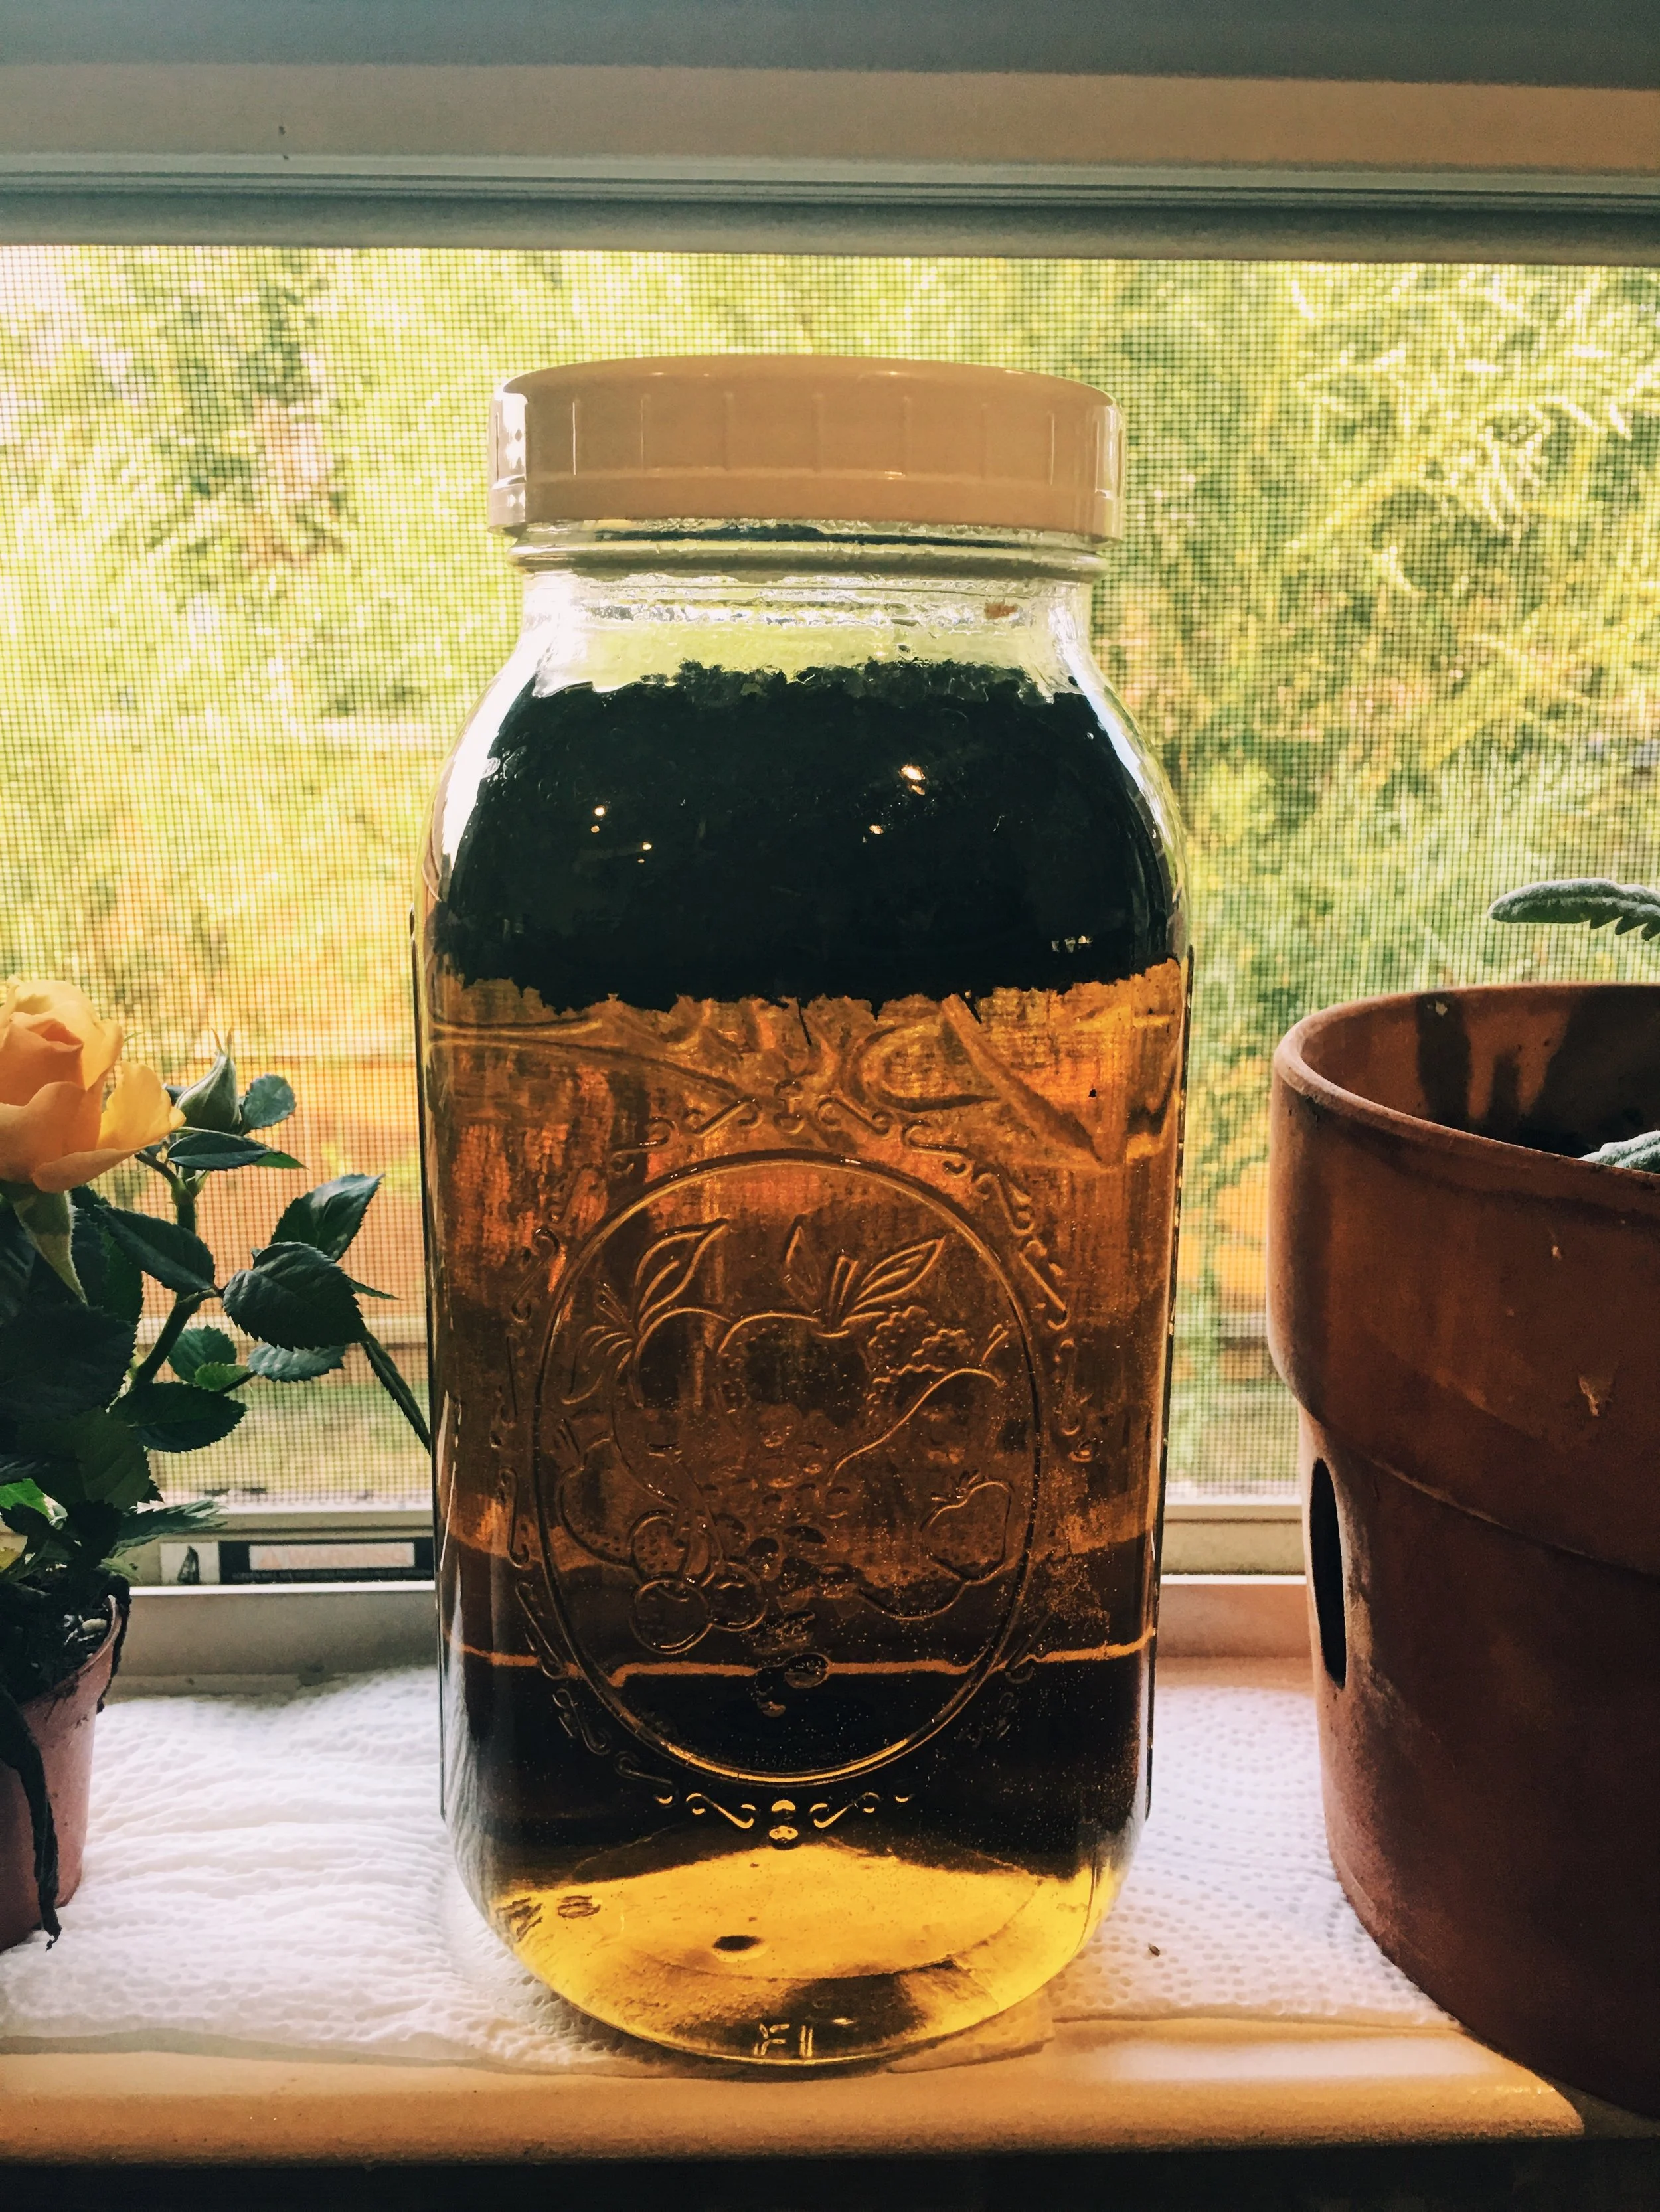
Many harvesters of stinging nettle consume nettle just like spinach and add the leaves into a stir fry. You will have to take caution (wear gloves) when harvesting and preparing them, but once cooked the ability to sting is gone and you have a delicious and nutrient dense powerhouse to add to your meal plan.  Stinging nettle is also available as dried leaf, freeze-dried leaf, extract, capsules, tablets, and as root tincture (a solution of the herb in alcohol), juice, or tea.  I prefer to consume this powerhouse weed, as some call it, by making an infusion.  An infusion is simply a process of soaking the leaves in filtered water.  

Here's how:

  • Boil 1 quart of filtered water

  • Place 1 ounce of dried organic stinging nettle in the bottom of a glass quart sized jar.  See below for where to purchase dried stinging nettle.

  • Pour boiling water over the stinging nettle until the jar is full.  You can place a butter knife across the top of the jar to help diffuse the heat and avoid breaking the jar.

  • Let steep for 4-8 hours. Some prefer to let it sit overnight.

  • Strain the nettle from the infusion and enjoy.  

  • Place your used nettles in your compost bin!

  • I prefer to drink my nettle infusion cold so I store in the refrigerator immediately.  

  • You can store the infusion for up to 72 hours, if refrigerated.  What you are unable to consume you can use to water your house plants.  They will love the minerals, too!

  • I consume approximately 3-4 six ounce glasses per nettle infusions, per week.

Stinging Nettle Making
Stinging Nettle Strained

Are there any considerations or precautions?

The use of herbs has been around for thousands of years and has been a time-honored approach to strengthening the body and fighting disease.  However, just like prescription medication and supplements, herbs can trigger side effects, and also may negatively interact with other herbs, supplements or medications.  You should always take herbs, supplements and medications with care and discuss your herb, supplement and medication routine with your health care provider. 

Resources:

Where to buy Stinging Nettle

Rose Mountain Herbs

Star West Organic Botanicals

Additional Reading on the benefits of Stinging Nettles

http://www.umm.edu/health/medical/altmed/herb/stinging-nettle

http://pennstatehershey.adam.com/content.aspx?productId=107&pid=33&gid=000275

Stinging Nettle Infusion
Tags nettle, stinging nettle, minerals, make your own, DIY, healthy living, wellness, healing
Comment

Oil Pulling & Toothpaste

June 30, 2016

I am a firm believer in the practice of oil pulling for great dental hygiene.  I started oil pulling a few years ago, and it has improved my dental health.  No more plaque buildup and no more bleeding gums. I have only had 1 cavity my entire life, so I won't attribute that to oil pulling, but I will attribute it to that fact that we drank fresh spring water from a natural spring all of my childhood and ate primarily a traditional diet of homegrown veggies, fruits and grass-fed meats. We weren't perfect by any means, but for the sake of a small budget, we ate a traditional diet.  I guess now a days many think it's cheaper to eat the fast food /pre-packaged diet that is void of minerals.  I beg to differ that it has to be cheaper, but I will save that for a different post.  

Why I decided to try Oil Pulling

A few years ago I was having a routine dental cleaning and I was told that I needed a periodontal cleaning that would include 4 different visits.  To make a long story short, let me just tell you that I ended up with a swollen jaw the size of a softball and an infection that took months and heavy doses of antibiotics and antibiotic rinses to get rid of.  The next year we had moved to a different state, so I visited a new dentist for a routine cleaning and I was told that I needed periodontal cleaning, again!  Really? My previous dentist told me that I wouldn't need it for years as I was clean as a whistle and was a "slow" plaque generator.  I told my new dentist that I had received a complete periodontal cleaning only 1 year prior and they quickly agreed that I could wait a few years.  Thanks for the up sell, but no thank you.

So, I decided to take this part of my dental health into my own hands. I researched holistic dental hygiene therapies and came across numerous testimonies and a few studies done on Ayurveda Medicine and the practice of oil pulling.  In Ayurveda Medicine, the practice of oil pulling for dental health goes back about 3,000 years.  Oil Pulling reportedly has recently (1992) resurged with great success in several medical practices.  Let me be clear, I am not telling you to skip dental care, but what I would like to get across to those who are interested, is to take control of your own dental health and your own overall health. Keeping in mind, conventional medicine/dentistry is big business.  I agree that scientific studies are of importance and I research everything and look and read studies on a daily basis, but I have found that the quality control failures are many, as such that studies are wrongly used to the limit the use of traditional medicine, when research has found that in the US, 51% of FDA approved drugs have serious side effects not detected prior to their approval.  The incidence of serious and fatal adverse drug reactions in US hospitals is reaching between the 4th & 6th leading cause of death in the US.  

One little study worth noting was a study done on oil pulling with sesame oil (group 1) versus chlorhexidine mouthwash (group 2).  Chlorhexidine is a form of bleach that is "reportedly" safe to use on the skin and other bodily surfaces.  Interestingly, both groups showed the same substantial reduction in bacteria including Streptococcus mutans.  This little study, along with hundreds and hundreds of testimonies was enough for me to give oil pulling a try, not to mention that I loved the idea of using a healthy oil to rid my mouth of bacteria verses over the counter mouth washes. I am happy to report that I am still oil pulling today, and I can personally attest to the results. 

How to Oil Pull

Chose a raw/organic cold pressed oil (coconut oil/sesame oil are my favorites and I love to switch them around from time to time)  

First thing in the morning take 1 tablespoon of oil and swish in your mouth for approximately 20 minutes. You may have to work up to 20 minutes.  A good time to do this is when you are in the shower or getting ready for your day.

Avoid swallowing the oil. The oil will be full of bacterial pulled from your teeth and gums.

Spit the oil and rinse your mouth thoroughly with water and brush your teeth with your favorite non-toxic toothpaste.  I prefer Dr. Bronner's toothpaste as it contains 70% organic ingredients and none of the ingredients that I prefer to avoid and are found in conventional/mainstream toothpaste; or I occasionally make my own with equal parts of coconut oil, baking soda  and organic flavor extract like peppermint, cinnamon or licorice.  There are many homemade toothpaste recipes on the web.  Let us know if you find one that is a must share.

Oil Pulling Claims via numerous testimonials

  • Significant reduction in plaque/tartar

  • Increased gum health

  • Whiter teeth

  • Migraine headache relief

  • Correcting hormone imbalances

  • Reducing inflammation of arthritis

  • Reduction of indigestion

  • Aids in the reduction of eczema

  • Reduces sinus congestion

  • Aids in sleeping difficulties 

  • Aids in reducing pain

  • Reduces the symptoms of allergies

  • Helps detoxify the body of harmful metals and organism


Tags oil pulling, toothpaste, natural toothpaste, make your own, DIY, Oral care, Oral Hygiene, sesame oil, Dr. Bronners, Healthy Living, Wellness
Comment

Amazing Immunity Protein Bars...

May 2, 2016

This yummy bar just happened by accident, like most recipe creations or makeovers do.  I wanted a bar that would incorporate all the minerals that I was seeking in my nutritional balancing plan and it just turned into this amazing bar, full of immunity building nutrients as well as some good protein.

Ingredients- the ingredient measurements do not have to be exact.  I have found myself not even measuring when I make these now and just throw the ingredients in, and they always turn out wonderful. If you like it sweeter then add more honey, if you like it sweet and salty, add more salt, etc. Enjoy!

DRY INGREDIENTS

2 Cups of Organic Steel Cut Oats

1/4 Cup of each type of organic chopped raw nuts (pecans, walnuts, cashews).  I prefer to soak the nuts overnight to eliminate some of they phytic acid to aid in digestion and assimilation.

1/4 cup of each type of organic raw seeds (sesame, chia, flax, pumpkin)

4 scoops of protein collagen (my favorite is Vital Proteins Collagen Peptides)

1/4-1/2 teaspoon of celtic salt

1 Tablespoon of finely ground bee pollen (I grind mine in a simple coffee grinder)

INGREDIENTS TO BLEND IN VITAMIX/BLENDER

12-16 pitted Medjool Dates (you could use prunes, raisins, etc., I simply enjoy the texture of the dates in this recipe)

1/2 cup of Honey

1-2  tablespoons of Elderberry Syrup (optional)

1/2 teaspoon of organic vanilla extract

1/2 - 1 cup of raw cashew, almond, or pecan butter

Process:

Mix dry ingredients together and set aside.  Blend Dates, honey, elderberry, vanilla, and nut butter in Vitamix.  Mix all ingredients together.  This may take a little work so wash your hands and get in there and get those hands dirty. Press out onto a parchment paper lined baking pan or roll into balls and place in freezer for 10-20 minutes.  Enjoy the taste and the wonderful nutrients of this amazing bar!

Be Blessed!

Tags protein bars, healthy snacks, healthy recipes, healthy desserts, desserts, snacks, bars, recipes, healthy living, DIY, make your own
1 Comment

Easy Homemade Toothpaste

September 13, 2015

Commercial toothpastes are commonly full of all kinds of ingredients and harmful chemicals like fluoride and foaming agents that may be harmful to your health.  For this reason, I prefer to make toothpaste for my family.  It's not only healthier, but more economical.  

My results: My teeth are whiter, the sensitivity to hot and cold has disappeared, no tartar build up, and my gums no longer bleed!  I'm sold.

Ingredients:

Organic Coconut Oil- research shows that coconut oil is effective against cavity causing bacteria and maintains a natural lipid enzyme balance on the tongue. I prefer to purchase expeller-pressed organic coconut oil.  

Bob’s Red Mill Baking Soda- acts as an abrasive and helps whiten teeth.  It works! I like Bob's Red Mill because of it's finer texture.  Most baking soda's, without added ingredients, will work just fine.

Organic Peppermint Extract to flavor.  Some people prefer to use essential oils and that is a personal choice.  I 100% agree in the benefits of aromatherapy and use EO's daily, but I do not believe in ingesting them in any amount so I prefer to us organic extracts to flavor foods and homemade toothpaste.

Magnesium Chloride Oil- this is a newly added ingredient to our homemade toothpaste. Since magnesium is responsible for so many processes/systems in our body I decided to add easily absorbable magnesium chloride spray to our dental hygiene regime.  You can even make this toothpaste without the Mag Chloride and spray your toothbrush 1 or 2x per week and brush with mag as an added benefit. You can make your own with Magnesium Chloride Flakes and Distilled Water, or order online.  Here is my favorite: Magnesium Mist Oil

Instructions:

Mix all ingredients together and place in glass storage container. You can play around with the measurements to suit your taste and texture. 

Coconut Oil- about 1/2 cup (feel free to double the recipe, if need be)

Baking Soda- 1/2 cup

Organic Flavor extract- 1/8 tsp. or less

Magnesium Chloride Oil- 2 teaspoons.  

Brush teeth daily with generous amount.  My preferred method is a combination of oil pull/brush technique.  I wash my tooth brush in hot water and then scoop out a generous amount of homemade toothpaste and swish around in my mouth for as long as I can- about 10 minutes.  I then spit it out, rinse and scoop another generous amount onto my toothbrush and brush my teeth, gums, tongue and rinse.

Here's to a healthy mouth.

Tags toothpaste, homemade, healthy, organic, minerals, teeth, oil pull, make your own, sustainable, recipe
Comment

Kombucha Tea

My Kombucha Tea

April 16, 2015

Kombucha is a fermented tea that packs antioxidants, enzymes, probiotics & prebiotics, B-vitamins, and organic acids and it tastes delicious!

I will be honest and say that I have had to experiment with brewing my own, but I am not giving up.  I have tried making a brew from a dehydrated Scoby, to no avail. I recently purchased a Scoby from Natural Grocers and this batch seems perfect. It's sweet & a little tart, just like I like it!  Fermenting is truly trial and error, but so worth the effort.  

Ingredients:

1 Scoby (purchased or collected from a store bought bottle of Kombuch, or ask a friend who brews their own for a Scoby.)

1/4 cup of Scoby Juice (this should come with your Scoby)  If you are using a Scoby from a bottle of store bought Kombucha save some of the brew)

1 Gallon of Filtered Water

1 Cup of Organic Pure Cane Sugar 

8 Organic Black Tea Bags


Process:

This is what worked for me: I simply purchased a Scoby from Natural Grocers, boiled a gallon of filtered water, added 1 cup of sugar until dissolved, added 8 organic black tea bags and let simmer for 10 minutes.  I then let the mixture cool completely in my 3 gallon jar and put my new scoby and the liquid it came with (about 1/4 cup) in the jar with the tea.  Make sure your tea is completely cooled to avoid damaging your scoby.  I placed my brew in a warm place that is out of direct sunlight for about 8 days.  On day 8,  I tasted my brew to ensure that it was the sweetness and tartness that I like and poured the tea into fermenting bottles that I had filled 1/4 full with my favorite organic fruit juice. Leave a little room at the top of your fermenting jars.  I will keep the brew in the fermenting jars, out of direct sunlight, for a few days to add a little fizz and then I will ENJOY!   I  then placed "Scoby" and 1/4 cup of its previous brew in a clean bowl while I prepared another batch of tea.  For a continuous brew: start your tea making process over and when cooled just add your Scoby and 1/4 of the previous brew and check it in 8 days or so.

Happy Brewing!  Happy Gut!

Tags kombucha, kombucha tea, homemead, homemade, DIY, healthy beverages, make your own, homesteading
Comment

Latest Posts

Summary Block
This is example content. Double-click here and select a page to feature its content. Learn more
Featured
Jun 3, 2025
Porta
Jun 3, 2025
Jun 3, 2025
May 27, 2025
Etiam Ultricies
May 27, 2025
May 27, 2025
May 20, 2025
Vulputate Commodo Ligula
May 20, 2025
May 20, 2025
May 13, 2025
Elit Condimentum
May 13, 2025
May 13, 2025
May 6, 2025
Aenean eu leo Quam
May 6, 2025
May 6, 2025
Apr 29, 2025
Cursus Amet
Apr 29, 2025
Apr 29, 2025
Apr 22, 2025
Pellentesque Risus Ridiculus
Apr 22, 2025
Apr 22, 2025
Apr 15, 2025
Porta
Apr 15, 2025
Apr 15, 2025
Apr 8, 2025
Etiam Ultricies
Apr 8, 2025
Apr 8, 2025
Apr 1, 2025
Vulputate Commodo Ligula
Apr 1, 2025
Apr 1, 2025

Powered by Squarespace